
By: Dr Tristan Jenkinson
Introduction
I have recently been taking part in a capture the flag challenge focused on email forensics – see for example an article that I put out on LinkedIn here. The competition completed last week and I am very happy to have finished in third place.
One of the challenges involved an inventive use of DKIM – an email validation methodology. As part of solving that challenge, I put together a manual walk-through of the DKIM validation process and thought that it might be helpful to share. This article is a combination of solving the puzzle, demonstrating the procedures and power behind DKIM, and talking about how the methods used here could be extended and implications for the forensics community.
A word of warning, this article does start to go into some of the more technical aspects of email forensics. I have included an introduction to DKIM and why it is so useful before delving into some of the more technical aspects.
What is DKIM
DKIM stands for Domain Keys Identified Mail. It is an authentication method that can be used to determine if an email is the same as it was when signed by some authority (often the sending domain).
This is done through a combination of content standardisation (canonicalization), hashing, and verification using public key cryptography.
The reason that DKIM is so useful in email forensics is that if it is present in the email header, it can be used to determine if the email body, or any of the headers included in the DKIM calculation (more on that below) have changed since the email was signed. It is therefore a fantastically useful method to identify if the content or dates of an email have been altered.
How it works
At a high level, when an email is sent, a series of calculations are made to generate the content of the DKIM Signature header field, encoded into the email itself:
- The body of the email is standardised and then hashed – this is the “body hash”.
- A predefined list of header fields (including the body hash) is then standardised. This standardised list is then hashed – this is the “data hash”.
- The data hash is then signed by the authenticating domain using their private key to create the signed hash.
- The signed hash is included in the DKIM signature header entry, together with the body hash and the various settings used, so that the receiver can verify the email.
Once received, to verify the DKIM the receiver can use the information in the DKIM signature, using the following steps:
- Identify the relevant authenticating domain and obtain the corresponding public key
- Standardise the body of the email and hash it using the same method
- Compare that hash to the body hash included in the DKIM signature – if they differ then data in the body hash has been changed since it was signed by the authenticating domain
- Standardise the relevant header fields and hash these with the relevant body hash to create a test data hash.
- Using the obtained public key, verify that the test data hash is the same hash that was signed by the authenticating domain.
- If not, then some data has been changed since the email was signed.
Further information
Arman Gungor (who put together the CTF competition) has a great article that covers more about DKIM and how it works. This article will expand on some of the content found there, with a focus on the manual steps that can be taken, linked to a particular challenge from the Capture the Flag competition.
The Challenge
The example email that we are going to work on comes from Arman’s Capture the Flag competition. This particular challenge was entitled “Superfrog”, and the challenge is below:
“Your team has been investigating cryptocurrency transactions for several months. You have received the following email with timing information that would be critical for your case.
Both participants in the email conversation are believed to be in Pacific Time. Having taken a quick look at the email, you suspect that the email has been manipulated.
Dig deeper and determine the correct origination date of the email (i.e., the value in the “Date:” header field). Enter the timestamp in UTC in the following format: yyyy-mm-dd hh:mm:ss (e.g., 2005-11-20 13:17:11)”
Initial Inspection
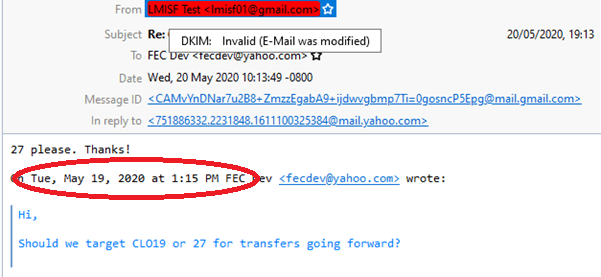
The email provided is in .eml format. Opening a copy of the email using Thunderbird (or your email program of choice) we can see that the email appears to have been sent on 20 May 2020 at 19:13 GMT from a Gmail account to a Yahoo account. The email body appears to show the email as a reply to an email sent on 19 May 2020 at 1:15 PM (likely Pacific Time i.e. GMT – 0800, according to the information from the challenge).
In Thunderbird I use some of the add-ons, such as DKIM Verifier. This means that you can automatically verify the DKIM signatures in emails.
If we take a look at the email in Thunderbird, we can see that the email fails DKIM verification (by the red highlighting):

DKIM verifier identifies that the email was modified. This is because the hash of the email body does not match the body hash stored in the DKIM Signature – we will look at this in more detail shortly.
As we have a failure in DKIM verification, specifically within the email body, it is likely that the email has been manipulated (as suggested in the Challenge information). For the next step, we take a look at the email structure itself.
A Starting Point
To look at the email structure, I used Atom with an eml plugin. This can be a really helpful way to look at emails in this format as it will highlight the various different values and can make the structure much easier to read.
From the initial inspection above, we know that the email was (apparently) sent from a Gmail account. One of the benefits of analysing emails from Gmail accounts, is that we have Gmail formatted MIME boundary delimiters.
For example see below in purple:
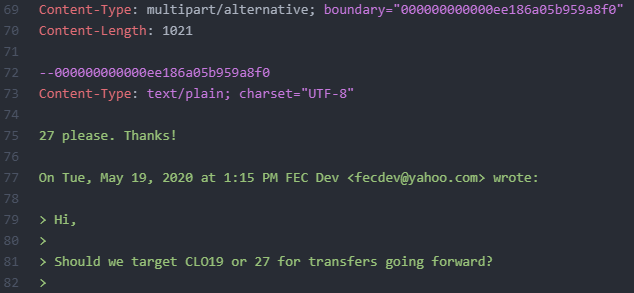
The reason that this is helpful is that Gmail MIME boundary delimiters contain embedded timestamps. They are not particularly obvious and generally seem to be less well known than other embedded timestamps. This means that typically they are less likely to have been altered compared to other, more obvious timestamps.
You can read more about Gmail MIME boundary timestamps and how they can be manually decoded here in another article from Arman Gungor. The article also mentions a tool from Arman that we can use to extract the embedded timestamp.

The program gives us a date and time of 01/20/2021 07:07:00.957290 PM (GMT) for the embedded time within the boundary. This value can also be derived from the manual process described in the article.
The date embedded in the Gmail content-type boundary field several months later than the time reported in the email (which was 20 May 2020). This casts significant doubt on the authenticity of the email.
This also gives us a starting point of when the correct date from the Date header field may be.
Arman commented in his Gmail MIME boundary delimiter article that:
“Note that this matches the origination date of the source email in this example. I have encountered scenarios where there was a relatively small (typically less than 30 seconds) discrepancy between the date found in the Gmail MIME Boundary and the origination date of the message.”
If the embedded date is reliable, it is likely within 30s or so of the date that we are looking for to answer the challenge.
Other Timestamps
Other timestamps that are present in the routing information are in plain sight as below:

These timestamps are consistent with the email having been sent on 20 May 2020. We therefore may view these with suspicion, given the Gmail MIME boundary delimiter date.
Similarly the X-Apparently-To header field contains another plain text timestamp that reports 20 May 2020.
There is an embedded timestamp in the X-Received header field:

This timestamp, 1589998440, is a UNIX epoch timestamp and decodes to Wed 20 May 2020 18:14:00 UTC (for example using CyberChef – https://gchq.github.io/CyberChef/). It appears that this timestamp has therefore also been manipulated.
We then get to the References and In-Reply-To fields, as below:

These fields are used to store the MessageID values for previous emails in the chain, and in the latter case, the MessageID of the email to which the email in question is a reply. These values appear to contain an embedded timestamp.
While this will not give us the date for this email (which is what the challenge is looking for), it may be helpful to decode.
1611100325 is a UNIX epoch timestamp and converts to Tue 19 January 2021 23:52:05 UTC. This is the apparent date of the email that is being replied to.
This is in line with the date that we have from the Gmail MIME boundary delimiter, and not with the dates originally reported in the email. It also casts further doubt on the 20 May 2020 date.
Compare to the Original Email
We have seen various red flags that point to this email having been changed – including the DKIM verification implying that the content of the email has changed.
Looking again at a copy of the original email we can see that it contains the time for the prior email in the quote string, as highlighted below:
This does not fit with the date and time extracted from the In-Reply-To value above. This suggests that this value has been changed. This would be consistent with the DKIM Verifier’s assertion that the email was modified.
Looking at the DKIM-Signature Header Field
If we take a look at the DKIM signature, we can see that there is no timestamp value stored directly here (this is an option and is often used).
Below is the full DKIM signature text from the email in question:
DKIM-Signature: v=1; a=rsa-sha256; c=relaxed/relaxed;
d=gmail.com; s=20161025;
h=mime-version:references:in-reply-to:from:date:message-id:subject:to;
bh=kxGpb2hnIwekTU0H4xsy1twedYbotMn692gCmNYnhLE=;
b=IdBl6YOzGY+oAAAKC/pU3SWtPqI98Nmz0mhLBq5f91pBp6DK6OMFWTSmfJWSM4OJ6WyWSnXd/Ch6/OZ9C1ud7vu0Nd+LFa4L65Y9v5rmMDBeBNOS2NI8akCSufHsg3/TFD1W5ebi+3F3tBZeBKAOgSi2uDYAtjj4Ia2eIF9aXpG5Xkf0vScqFwYFyAAv4qqblHoB02vIkUaQ5a+zvqWXlO9wnomw9/0WiyBvK65YfBUZVvGU9f1CEPGj9zmCeKcMYpFRdQX7oMU60zltw1VlEvkVr0kfxmNbYDtqJq3bQKuey9K9NWDGuVFZg1a5GSiI/Aq4ZcRQMC6ffYsdDgTWdA==
Below I discuss each of the values included (you can read the specification here) – the DKIM-Signature header field is covered in 3.5) and some of the values that have not been included but which you might find in the wild.
v – This value contains the version of DKIM in use. At the current time this is always set to 1 as only one implementation of DKIM currently exists. It is anticipated that there may be additional versions in the future. We can see our example above complies with this as we have v=1.
a – This value represents the algorithm which was used to generate the signed hash. The value splits into two, the first defining the public key algorithm, and the second describing the hashing algorithm. From our example, we see that the public key algorithm to use is RSA and we should use SHA256 hashing. At the time of writing the standard only mentions RSA-SHA1 and RSA-SHA256 as options.
c – This value indicates the type of canonicalization which is to be used to standardise the text from the headers and the email body respectively. There are two types of canonicalization for each, simple and relaxed. We can see here that we are using “relaxed” canonicalization for both – more on this shortly. Note that this field is not required – if not present, the default value is simple/simple. Similarly, if only one value is given it is assumed that this is for the header, and that simple canonicalization should be used for the body.
d – This value provides the Signing Domain Identifier (SDID) or authenticating domain – the domain which has signed the email. This is needed to gain the public key for verification
s – This value is the selector value for the relevant authenticating domain. Authenticating domains do not typically use a single key to sign all of their email over time, so this value can be used to identify the specific public key that should be used.
h – This value contains a list of all of the header fields that should be contained (and in what order) when creating the data hash. This field will not contain the body hash value, but the body hash is always included in the calculation of the data hash. It is worthy of note that (somewhat unintuitively) this value can include fields that do not exist in the email header. Such fields will simply not add anything to the calculation of the data hash. It may also contain field names twice. This means that the field value should be included twice when calculating the data hash.
Here we can see that we need to include the below in order (followed by the body hash):
- Mime-version
- References
- In-reply-to
- From
- Date
- Message-id
- Subject
- To
bh – this is the body hash of the email body, as calculated by the authenticating domain. It is stored in base64.
b – this is the signed hash – this is the value resulting from the original data hash being signed by the authenticating domain. It is stored in base64.
Other optional header values which can be used but are not included in this example include:
i – where the d value is used for the domain, the i value can represent a specific user or agent of that domain. This will be in the format of an email address, with the user or agent followed by an @ and then a domain value that is either the same domain as listed in d, or a subdomain.
l – this value stores the length of the body as a plain text decimal integer (limited to 76 digits).
q – a list of query methods to retrieve the corresponding public key to be used for verification. Currently there is only one valid value which is “dns/txt”.
t – this value is a timestamp stored as the number of seconds since 00:00:00 on 1 January 1970 and is assumed to be in the UTC timezone. The value is stored as a plain text integer.
x – this value gives a date after which the signature will expire. The date is stored in the same format as the t value timestamp above.
Note – I particularly like the informative note in the specification on signature expiration and clock drift which states “Receivers MAY add a ‘fudge factor’ to allow for such possible drift”.
z – this value contains a pipe delimited list of header fields and values separated. The header fields may differ from those included in the h value and not all header fields need to be included.
Two Approaches
As the challenge is to identify the value of the Date field in the email header, it is key to note that the Date field is included in the calculation of the data hash in our example.
This means that using DKIM, if we can verify a version of the email, we can confirm the Date value in the header.
Let’s recap:
- We know roughly what the date and time value should be (based on the Gmail MIME boundary delimiter).
- We suspect that this time we are looking for is within 30 seconds of the time which we are looking for (based on Arman’s comment in his article on the Gmail MIME boundary delimiter discussed above).
- We are looking to find a date value whose format includes seconds, but no further resolution.
- We would typically expect the Date sent value to be prior to the generation of the MIME delimiter
This means that we would want to test 30 or so different date values, for the time of the Gmail MIME boundary delimiter and the thirty seconds before that.
Also recall that the email body contains a quote string which appears to contain the incorrect time for that original email, whose time we have been able to ascertain from the In-Reply-To field.
I identified two potential approaches.
- Rebuild the email body, use multiple date values and verify the full email.
- Change the body text so that the date and time in the quote string value reflect the date and time of the In-Reply-To timestamp
- Check if hashing the body then matches the body hash stored in the DKIM signature header
- Change the Date header field by a second each time and test the email to see if it verifies – for example using Thunderbird and DKIM Verifier..
- Manual verification
- Use the body hash provided in the DKIM Signature header
- Create a new data hash for each different Date value to test
- Verify that hash against the signed hash in the DKIM signature
The potential problem that I foresaw with the first method, is that if there had been any other change to the body of the email (for example within the content of the email itself) then there would be no way to get the message to verify as the calculated body hash would not be correct unless you could “guess” exactly what the original body actually was.
The second, more manual approach would assume that the body hash value has not been manipulated. The benefit is that, if this is the case, then this approach will work, even if the content of the email body has been changed – because we use the correct body hash, rather than generating it from the email.
I decided to proceed with the second approach, as I suspected that further changes to the email content may have been present.
But as we demonstrate below, the first method would also have worked.
The Body Hash
Let us step through manually calculating the body hash.
As per the DKIM Signature header field, we need to apply relaxed canonicalization to calculate the body hash. This is therefore our first step.
The body hash is calculated between (and including) the various MIME boundaries. For our example, the full unchanged body text (with carriage return line feeds shown) is below:

To note the final CRLF after the final MIME boundary delimiter should be retained.
As the relaxed canonicalization is fairly minimal for the body hash, there are no other additional changes for us to make (see the specification for more details).
If we hash this content using SHA256 (as specified in the DKIM Signature header field), we get d4a6446e2baf565b5a74a16330d04deaf66b3b785a92f71eb2c357c04c44fe88.
We now need to convert this to base64. One way to do this is to use CyberChef. This can be done by providing the hash as input and using the “From Hex” and “To Base64” commands, as shown below:

The output (our hash in base64 encoding) is 1KZEbiuvVltadKFjMNBN6vZrO3hakvcessNXwExE/og=. Note that this does NOT match the body hash stored in the DKIM header.
This was expected, as we believe that the dates contained in the email body (within the email quote string) have been changed.
Let us now change the dates in the email body.
From the In-Reply-To field, we know what the date and time of the original email should have been – to Tue 19 January 2021 23:52:05 UTC.
Recall that the Challenge stated that both participants were believed to be communicating in Pacific time, we therefore need to convert this UTC time to PT, which is UTC-0800. So the time (23:52:05 UTC) would be 15:52:05 PT.
Putting this into the correct date format used in the quote string of the email (“Tue, May 19, 2020 at 1:15 PM”) we need to change this to “Tue, Jan 19, 2021 at 3:52 PM”
Our text now looks like this:

We can then calculate the hash again using SHA256. The hash calculates as 9311a96f68672307a44d4d07e31b32d6dc1e7586e8b4c9faf7680298d62784b1.
We now need to convert this to base64. Using the same CyberChef messages as above, we find that the base64 encoded SHA256 hash is kxGpb2hnIwekTU0H4xsy1twedYbotMn692gCmNYnhLE=.
This matches the body hash in the DKIM header. Note that this does not necessarily mean that it is correct – the body hash in the DKIM signature header field could have been manipulated to match this value, though it seems likely that if the stored body hash had been manipulated, it would have been changed to match the content of the email.
However, now that the hash of the email body matches the body hash in the header, this means that an original copy of the email (in .eml format) with this body change, could have the date value updated, and an automated email verification tool such as DKIM Verifier in Thunderbird, or DKIMPY could be used to verify the whole email.
This is not the method that I used. As discussed above, I did not try to correct the dates in the email body, as any other changes in the body would result in the body hash failing to match the value stored in the header.
Instead, I used the body hash value in the DKIM header, creating different canonicalized headers with the different date values in, then calculated the relevant data hashes to manually verify against the signed hash in the DKIM header. I show below how this approach works.
Getting the Public Key
To perform the verification, we need to be able to verify against the hash which was signed by the authenticating domain.
We use the domain and selector values (d and s) from the DKIM Signature header field to pull down the relevant public key with which we can verify the header. In our example, we have a domain of “gmail.com” and a selector of “20161025”.
We can use MXToolBox’s DKIM lookup to find the relevant public key. To do this, go to the DKIM section on the MX ToolBox website. Here you can type in the relevant domain and selector. The return is the type of key (in this case RSA) and the public key, as shown below:
MIIBIjANBgkqhkiG9w0BAQEFAAOCAQ8AMIIBCgKCAQEAviPGBk4ZB64UfSqWyAicdR7lodhytae+EYRQVtKDhM+1mXjEqRtP/pDT3sBhazkmA48n2k5NJUyMEoO8nc2r6sUA+/Dom5jRBZp6qDKJOwjJ5R/OpHamlRG+YRJQqRtqEgSiJWG7h7efGYWmh4URhFM9k9+rmG/CwCgwx7Et+c8OMlngaLl04/bPmfpjdEyLWyNimk761CX6KymzYiRDNz1MOJOJ7OzFaS4PFbVLn0m5mf0HVNtBpPwWuCNvaFVflUYxEyblbB6h/oWOPGbzoSgtRA47SHV53SwZjIsVpbq4LxUW9IxAEwYzGcSgZ4n5Q8X8TndowsDUzoccPFGhdwIDAQAB
Decrypting the Signed Hash
As we want verify hashes manually, we want to be able to “decrypt” the content of the signed hash to identify the hash that was signed by the gmail.com authenticating domain.
This can be done this using OpenSSL, which you can use to apply a public key (in .pem format) to “decrypt” a signed value.
The first step is to put your public key into .pem format and save is as a .pem file. This can be formed from the value above by adding:
—–BEGIN PUBLIC KEY—–
And
—–END PUBLIC KEY—–
at the beginning and end of the file respectively. The save the file (using a text editor) as a .pem file. The content then looks like this:

Note: I saved this file as F:\Metaspike\Superfrog\public key.pem.
The next step is to extract the information from the signed hash (stored in the DKIM header as the value assigned to b) and save this to a file.
The data stored in the email header is stored as a base64 conversion. A simple way to convert these values to files is to use CyberChef.
Paste in the value, remove out all of the spaces, use the From Base64 option, and save the output directly to a file. I saved this out to F:\Metaspike\Superfrog\Signed Hash.dat.
We can then run an OpenSSL command to use the public key to “decrypt” the signed hash content. I have inserted the file locations for the relevant files as mentioned above. The OpsnSSL command is below:
openssl rsautl –verify –inkey “F:\Metaspike\Superfrog\public key.pem” -pubin –in “F:\Metaspike\Superfrog\Signed Hash.dat” –asn1parse

Here we can the SHA256 hash value that was signed, displayed in hex.
We now know that we are looking for a data hash value of:
0ac62e8e785124d8647af0cb80c58a25c254f47e316aab1702eb43639b7e5f36
Canonicalizing the headers
The next step is to go through and canonicalize the headers (for further information see the specification). We are using relaxed canonicalization. The main points here are:
- Put all of the headers fields into lower case (note that values should not be changed)
- Remove the whitespace before and after the colons between the header field names and the relevant values (the colon itself should be retained).
- Multiple whitespace values should be replaced with a single space
- Whitespace at the end of each line should be removed, but this is not an issue here.
We also need to include the whole DKIM signature line, but with an empty value for b. The header therefore ends with the text “b=”. Note that there is no semicolon following this value (which I have seen suggested online) and no carriage return line feed – the last two characters of the file should be “b=”.
As discussed earlier, we want to use the date and time from the Gmail MIME type boundary delimiter as a starting point. So I have inserted this time – 20 January 2021 at 11:07:00 PT – in the below (in the same format as it was in the original header).
The canonicalized header values which will be hashed to create the data hash are below. Note that the line numbers show where a line has simply been wrapped to the next line for display purposes:

Generating Multiple Data Hashes!
Recall that:
- We know roughly what the date and time value should be (based on the Gmail MIME boundary delimiter).
- We suspect that this time we are looking for is within 30 seconds of the time which we are looking for (based on Arman’s comment in his article on the Gmail MIME boundary delimiter discussed above).
- We are looking to find a date value whose format includes seconds, but no further resolution.
- We would typically expect the Date value to be prior to the generation of the MIME delimiter
We have created our starting point – a canonicalized header file set up with the time from the Gmail MIME boundary (created in the last section). We now want to create multiple versions, so that we can test each value to see if the hash matches the signed hash.
Based on the above, it makes sense to start with the time from the Gmail MIME boundary and go back 30 seconds. Therefore we want to create 30 variations, one for each second that we go back – starting at 11:07:00 and going back to 11:06:30.
This could be done programmatically, or given the relatively low number of files and minimal changes, you could create 30 copies of the file and change the Date value accordingly.
We should now have a series of 31 different files, each containing a canonicalized header with Date values of 11:06:30 through to 11:07:00. I created a file (00).txt which contained the 11:07:00 time, and then numbered the files from there, going back a second, so (01) uses the time 11:06:59, (02) uses the time 11:06:58 and so on.
We now need to hash all of these canonicalized headers. From the DKIM header, we know that the SHA256 function was used, so this is the hash that we need to use.
I used EnCase to hash all of the 31 header files.
The hash of file (11).txt was 0ac62e8e785124d8647af0cb80c58a25c254f47e316aab1702eb43639b7e5f36. This matches the signed hash (identified in the Decrypting the Signed Hash section)
This is the variation with the date set to “Wed, 20 Jan 2021 11:06:49 -0800”.
This means that this was the value in the Date field of the email.
Further Verification
Recall that earlier, we identified the changes that were required to get the body hash of the email to match – updating the quote string with the date and time from the In-Reply-To embedded timestamp.
But we now know the Date value that should have been present in the header.
Let us take a copy of the original email in eml format, and change the body content so that it matches the body hash, and the date header field so that it is set to Wed, 20 Jan 2021 11:06:49 -0800.
If we now open this email after making these changes, we can see that the DKIM Verifier now verifies the DKIM information contained in the email (with the green highlight):
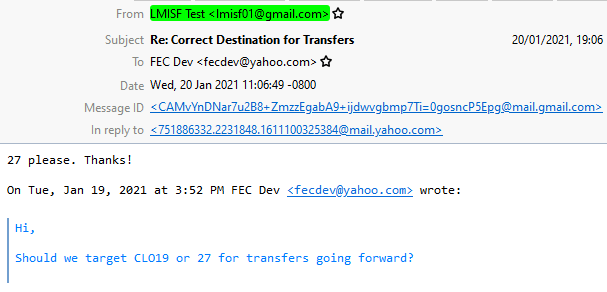
This is indeed the correct value for the Date field which is what the CTF challenge was looking for.
Notes and Implications
This run through gives the steps for how a forensic analyst can manually perform a DKIM verification (though typically they are simpler than shown here).
We have also demonstrated that even if the body text of an email has been changed, if the body hash stored in the DKIM Signature Header has not been manipulated, it may be possible to verify the header information (at least that which is contained in the DKIM header) as correct.
Note that the opposite approach, verifying the body hash while not able to verify the headers is not possible. This is because the body hash in the DKIM signature stored in the email header could be manually manipulated to match the hash of a manipulated email body. The only way to know that the body hash has not been changed is to fully verify. This would only be possible with the verification of the headers and the corresponding data hash.
While the method used here focusses on only one unknown field, if there are is known, or likely set of possible values for several header values in the DKIM header, then it should be possible to programmatically enumerate through the possibilities, calculating the potential hash at each point to find if there is a potential match to the signed hash.

I found your article while searching for [manually validate DKIM] on DuckDuckGo, and I just wanted to say thank you for the thorough walkthrough. Additionally, I had no idea that Gmail MIME boundary delimiters contained a timestamp until I read this. Great stuff, thanks!
LikeLike